
APPLICATION: This procedure applies to all Volkswagen Buses from 1968 to 1979 fitted with the CV joint independent rear suspension which superseded the independent swing axle suspension found on 1967 and earlier Buses. This also applies to 1980-1983 air-cooled Vanagons though on the Vanagon the trailing arms of the rear suspension make the outer CV joints much tougher to remove and install. This procedure was done on a Bus with a manual transmission. The automatic transmission procedure is similar, however the axle shafts on automatic models are not the same length so attention must be paid to what came from what side of the van. This may apply to water-cooled Vanagons but I can't be sure about that. Additionally the same concepts will apply to other Volkswagen rear-engine, rear-wheel-drive vehicles fitted with the same type of suspension, such as the Beetle, Super Beetle, Karmann Ghia, Thing, Type 3 and Type 4. However, the details may be different.
TOOLS: You will need some special tools for this operation. You will need a pair of snap ring pliers for removing the giant circlips which hold the CV joints onto the axle shafts. I bought mine at Sears for roughly $15. These are pliers that expand as you squeeze them, unlike conventional pliers. See the picture below:
Additionally you will need a 6mm allen key, assuming the CV bolts on your vehicle are stock. I've found it best to purchase a 6mm allen key fitted to a 3/8" drive socket, as it makes undoing and tightening the bolts much easier than using a standard allen key. See the picture below:

Some vehicles will be found to have CV bolts which at first glance appear to be standard allen head bolts but which are in fact not. These vehicles have the Porsche style CV bolts, and the proper tool is a 12-sided "triple square" tool, either 6mm or 8mm size, I forget which. These are NOT Torx bolts so do not try to use a Torx driver for them. Also they are NOT allen bolts so do not attempt to use an allen key on them as you will round them out and be SOL. You must buy the proper tool.
You may or may not need a puller to get the CV joints off the axles. In theory they should just pull right off by hand. However I have not been so lucky in the past. This time, on one axle the joints were extremely difficult to remove and I had to go purchase a puller to get the joints off. On the other axle, I removed the circlips and the joints fell right off. Go figure. If you do need a puller, I'd recommend one of the large 2-arm gear pullers, like in the picture below:

To do the job you will need some other standard tools -- sockets, ratchets, and a torque wrench. You will need LOTS of paper towels -- 3 rolls minimum. You will also need some grease to do the job. You should try to find grease that is labeled for use in CV joints. Volkswagen specifies 90g of grease per joint, you may want to go above that a bit. You will probably be OK with 2 tubes of grease, allocating half a tube per joint. I decided to try Mobil 1 synthetic grease, so we'll see how that holds up. You will also want to find out what you need ahead of time if possible. If you have cracked CV joint boots, order new ones. You are advised to only order new boots to replace ones that are already deteriorating -- if you have old ones that are in fine shape, by all means continue to use them. This warning is based on the spotty quality of aftermarket boots, some of which begin to crack all too soon after installation. Most boot kits come with the boot, new hardware and a small tube of grease intended for one joint. You will likely not know if you need to replace the CV joints until you remove the existing ones and clean and inspect them. There's no real need to replace the joints unless they have been rendered unserviceable for some reason but if you like new ones, be prepared to shell out $200 for a set of 4, from OEM manufacturer Lobro.
OK, well now that we've got all the tools and equipment, let's get started. You are probably doing this job either because you are masochistic and like to bring suffering and misery on yourself or because you have to as you've been hearing the dreaded knocking sound around corners and while accelerating. This is not a fun job but it has to be done sometimes. In my case I was hearing the dreaded knocking.
First you need to get the rear wheels off the ground. Chock the front wheels, make sure the Bus is in gear and the parking brake is set. Jack up each side and support it on jackstands with the wheels clearing the ground. Now crawl under the rear and survey the scene. Find the transmission and then find the two axle shafts, one on each side, that go between the transmission and the rear wheels. You will notice that at each end of each axle shaft there is a rubber boot. This boot is for the protection of the CV joints, to keep the grease in and dirt and water out. CV joints are rather impressive devices. The CV stands for Constant Velocity. Having the joints at each end of each axle makes the axles double-hinged, so that as the rear suspension traverses bumps and dips in the road surface, the wheels can remain vertical in their up and down travel. The older swing-axle suspension had universal joints only at the transmission ends of the axles so that on those Buses as the rear suspension traversed bumps, the rear wheels would travel in an arc up and down rather than remaining vertical. The double-jointed system allows you to maintain proper camber at all times.
So now have a look at what holds the CV joints and axle shafts in. There are six bolts at each joint, bolting the joints to the transmission at one end and the stub axle on the other. You need to remove these 12 bolts to remove the axle shaft with the CV joints attached. The trick is that you can't reach all the bolts with the wheel in one position, but you can't break the bolts loose if the wheel is free to turn. So here it really helps to have a helper to either apply the emergency brake for you when you need to loosen the bolts or to use gorilla power to hold the rear wheel steady while you loosen. While you're under there, see if you can isolate the bad joints (if any) by checking for free play. Grab the axle and try to rotate it with the parking brake on. It should not clunk back and forth as you rotate it. Make sure if you see any play you determine if it is in the differential or in the CV joint or in the rear wheel bearings. Also try pushing the axle fore and aft -- there should be no play. Wiggling the axle side to side will yield what appears to be an alarming amount of play, but this is in fact completely normal. The axle has to be free to slide side to side as its effective length changes as the suspension moves up and down.
Before attempting to loosen the bolts, get a small flat-blade screwdriver and scrape the gunk out of the head of each bolt. If you fail to do this, the tool you use to loosen the bolt will not seat properly and you are likely to round out a bolt head. If this happens, you are going to have a fun time with locking pliers trying to get the bolts out. While you are scraping, take a moment to verify what kind of bolts you have. Make sure they are either allen or 12-point, and don't assume that because one is allen, they all are. Buses have been known to have one joint held on with allen bolts and one held on with 12-point bolts. Look extra close before you try to loosen the bolts.
Once you know what kind of bolts you have, grab the appropriate tool and insert it into the bolt head. Tap the tool into the bolt head with your ratchet just to make sure it is seated properly. You really don't want to round the bolts out. Then have your helper hold the wheel steady and give the tool a quick jerk to break the bolt loose. This works better with allen bolts then trying to slowly increase force.
Once you break 'em loose, have your helper rotate the wheel to get the next one. Remove the bolts and washers and set them somewhere safe. However, leave one bolt in the joint at the wheel side and one in the transmission side so that you can control how the axle comes down rather than having it drop on your head. You will probably want to hold up the axle with one hand while removing the 2 remaining bolts with the other, then carefully lower the axle shaft down (it is heavy) and bring it out from under the Bus.
Lay down some newspaper and prepare to begin disassembly of the axle. You'll notice the joints are really really greasy. You will soon be just as greasy. Try to keep it straight which end of the axle goes to the transmission and which goes to the wheel. Mark with a scribe if you must. Then pick an end to start on and wipe the grease off the end of the axle so you can see the large circlip. Take your screwdriver and hammer and tap the boot off of the joint. Grab your snap ring pliers and remove the circlip, then try to pull the joint off the axle. If it comes off, lucky you. Go ahead and pull the boot off as well, then do the same with the other side of the axle. Try to keep it straight which joint goes where on the car. It doesn't matter if you're replacing them but if you're not you will want to know. Mark them if you must.
If the joints don't come off easily, you're in for some fun. Get your puller and go to town. Hopefully you won't break anything.
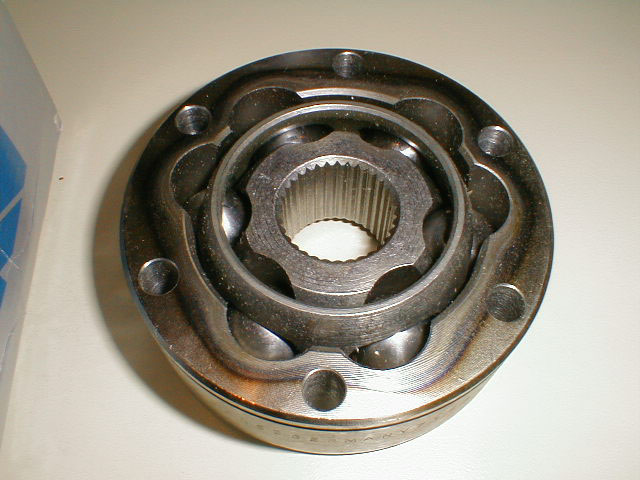
Once you've finally gotten the joints off, you can begin cleaning them up and inspecting them for wear or damage. Take a look at the joint. It consists of a large outer race in which six large ball bearings ride. These bearings are held inplace by a cage, and the bearings also ride in a smaller hub/inner race, the center of which is splined to transmit drive to the axle shaft. You will notice by looking at the attachment points at the transmission and stub axle that the splines are meaningless there. That means all torque from the transmission is taken by the 12 bolts on each side, which thread through the outer race. The joint provides a flexible coupling between the outer race and the axle shaft at the center. Those bolts are strong, so no you can't replace them with just any old bolts.
First you want to disassemble the joints. Push the hub out like you are trying to make the hub perpendicular with the outer race. This will cause some of the ball bearings to fall out, which will make the rest easier to get out. Then the cage and hub will come out of the outer race, and then you can twist the hub out of the cage. Now go ahead and clean them. Grab some paper towels and wipe off the majority of the grease. Then put the parts in your parts cleaner bucket and let them soak for about 20 minutes. DO NOT mix up the parts from different joints. The joints are matched at the factory for tolerance -- you can create problems by mixing and matching parts, from excessive slop in the joint to binding.
While the parts are soaking in the cleaner, take some time to go under the Bus and wipe the old grease from the flange on the transmission and the stub axle at the wheel. Make those nice and clean so no old grease or dirt will get into your freshly greased or new joints. Also wipe the old grease out of the boots (if you will be reusing them) and clean up the axle shafts. It also doesn't hurt to put all the hardware into the parts cleaner (unless you got new hardware with your new boot kits).
OK, after the soak is done, remove the parts from the parts cleaner and wipe them down. You are now ready for inspection. First inspect the ball bearings. Look for signs of bluing (indicating excessive heat) or for pitting and scoring. If any of these are detected, the joint must be replaced. If the ball bearings pass inspection, check the inner and outer bearing races of the joint. Again you are looking for bluing, scoring and pitting. Any of these symptoms mandate joint replacement. My joints were all severely pitted on the inner race surfaces, though all the ball bearings were OK and most of the outer races were OK. I have some close-up pictures below of what pitting looks like on the inner race surface:


As an interesting side note, you can check the joint to see if it is likely original. Lobro was kind enough to put a date stamp on their CV joints. You can find it on the outer edge of the outer race, near the VW part number. You will have to clean the crud off to see it. It's just a simple month/year date stamp. Mine were stamped 7/78 indicating that they were the original joints installed on the van. And they look like it too.
As you can see by the above pictures, my joints were ugly. All four were similarly pitted, so I had to order a new set of four. I also had 2 boots that were cracked and two VW logo boots which are holding up fine. I ordered 4 joints and 2 boot kits from The Bus Depot as they have OEM Lobro joints for $46 when I ordered and German boot kits at $10 each. Don't quote me on that though, it's possible that this was written a long time ago depending on when you are reading it.
Repeat the cleanup and inspection dance for each joint. Repeat with the other axle too. Try to keep track of where everything goes. If you find out your old joints are dead go ahead and get new ones but if you inspect them and they merely show normal wear but no other bad symptoms as mentioned above, there's no need to replace them.
OK, well now it's time to put it back together. Make sure you've thoroughly cleaned all your parts. Cleanliness is important in reassembly as pieces of crud and dirt will ruin your CV joints. If you are reusing your CV joints, bully for you. If not, unpack your new ones and dip them in the solvent to clean them up a bit. Let them dry thoroughly before greasing. Here's a new CV joint, notice the fuzz on it from the cardboard box it came in:
And here's one of the Febi/Bilstein German boot kits that Bus Depot sells:

DO NOT disassemble the new CV joints. Yes, they are supposed to be that tight. That just shows you how sloppy your old ones are. If you disassemble the new ones, you will likely never get them back together. I find it easier to grease the joints before installing them on the axle. But your mileage may vary. Get out your grease. If you bought new CV boot kits, they should come with tubes of grease for you to use. If not, get your grease from the parts store. Make sure your grease is intended for use in CV joints, it will usually say that on the packaging. It will also say it's an "extreme pressure" grease. I decided to give Mobil 1 synthetic grease a try. Turns out that the grease is red, so it gives the whole job a nice splash of color.
You want to use two tubes of grease, half a tube per CV joint. Volkswagen specifies that you use 90 grams of grease per joint, a little more is good. You pack the joint full of grease like you would a wheel bearing. Get a big glob of grease in the palm of your hand, then force it up into the joint. You will eventually start seeing it come through when looking at the other side of the joint. Use that reference point to see where you need to push grease through. Keep packing it in there, then switch to the other side of the joint and do the same thing. Get plenty of grease in there. You will find it very messy and disgusting, but it's gotta be done.
Repeat that procedure with all four joints and set them down on a CLEAN piece of newspaper. Now wipe your hands off and let's prepare the axle shafts. Make sure they are clean, then put the boots on. Stretch the small end of the boot around the end of the axle shaft, and then the boot can be slid down into position. You'll notice on the axle shaft that there are two bumps at each side. The small end of the boot is supposed to seat between these bumps. Get both the boots on and in place.
Now it's time to put the joints on the axle shafts, and this is where it can get ugly. If your joints all came off very easily then you will likely have no trouble. If you had trouble getting the joints off, you will likely have trouble getting the joints back on. If the joints just slip onto the axle shafts, congratulate yourself. If not, you will likely have to force them on. In that case, grab a block of scrap wood, a hammer, a 36mm socket (what VW owner doesn't have a 36mm socket??) and prepare for a battle. First, look at the joint. On the outer surface of the joint, there is a groove that runs all the way around, near one of the edges. In theory the joint should be installed so that this groove is nearer to the boot, but in practice I don't think it matters. Before you start putting the joint on, make sure that the bolt holes in the CV joint are lined up with the bolt holes in the boot.
Set one end of the axle shaft on the block of wood, so as not to damage it. On the other end, start the joint (sometimes they will start a little and then won't go any further without persuasion), then place the 36mm socket, open end down, onto the hub of the CV joint. Hold it in place while you take the hammer and beat on it mercilessly. Check every now and then to make sure you are driving it on straight. When it gets to the bottom of its travel and is seated, get your snap ring pliers and the new circlip that came with the CV joint, and put the new circlip in place. By the way, you may notice that your old CV joints had a concave washer installed beneath the joint. This washer is not to be used when you reinstall the CV joints, so says Bentley. New boot kits come with this washer, but do not use it. If you do use it, good luck getting the circlip on!
Repeat with the other 3 joints, and make sure to clean out any wood chips from the axle ends. Once you have done that, you are ready to install the joints. For installation, it's easier if you have a helper who can support the axle shaft while you start the bolts through the CV joints.
Grab your hardware -- for each axle shaft you need 12 bolts (use new ones if they came in your boot kit), 12 washers (reuse old) and 6 of the weirdly shaped things (reuse old). The Febi/Bilstein boot kits come with new bolts of the 12-point triple square variety but do not come with washers or the other things. Adjust the CV joints to what angle you think they should be at for proper installation, i.e. having the joints set perpendicular to the shaft isn't gonna cut it for installation because that's not how they are oriented when installed in the car, since the transmission's drive flanges and the stub axles at the wheels are not at the same elevation. Bend the joints as appropriate to where you think they should be. It doesn't have to be perfect, just good enough to get the bolts started, which will pull them the rest of the way. Slide under the van and have your helper hang out at the rear wheel. Push the axle shaft up into place. Seat the transmission end first, then the wheel end (unless you have a Vanagon, then reverse that). Have your helper support one end of the axle shaft while you get the bolts started in the other end. You need to have at least two bolts started before you rotate the wheel, or else things will get misaligned. If the axle appears to be too short, it's because the joints are not expanded like they need to be. Remember that the joints allow for side-to-side play because the effective length of the axle changes as the suspension moves up and down. To remedy the short axle problem, bolt one side down and then kinda wiggle and pull to make the other side reach. Alternatively you can loosen one side a bit to give you enough stretch to get the other side's bolts started.
Once you get the bolts started, go around and get them all in and run them down snug. Then grab the torque wrench and torque all of them to 25 ft-lbs. Have your helper rotate the wheel so the bolts come into position, then have him/her hold the wheel steady while you torque the bolts (or have him/her apply the parking brake while you torque). You can do this by yourself, but it means getting the wheel in position, getting out from underneath the car, setting the brake, getting back underneath, torquing, getting back out, releasing the brake, rotating the wheel, etc. You will do this at least 6 times per axle unless you have a helper. Repeat for the other side.
That's basically it. Now you have to clean up the colossal mess you've made. Also wipe any excess grease off the CV joints, off the boots, off the axle shafts, and off the wheels/tires if you banged 'em around under there while installing. Wipe all the grease off your garage floor, burn your clothes, and you are set. Go drive the van and hope that knocking noise isn't still there! Also, check the torque of the CV bolts after some driving -- they tend to loosen themselves up once after installation.
Sean Bartnik
January 9, 2000