The propane tank on my '81 Westy had developed a leak in the on/off valve located on the tank. I decided to remove the tank and have the valve replaced by a local RV store. To facilitate the replacement of the valve, the tank should be removed from the car, which is really not all that hard.
The first step is to make sure the tank is empty or else the service guy will get a surprise when he removes the old valve. You can either use up all the propane that's in there (which is what I did) or vent it in a safe area. The venting idea makes me nervous, so I just used up the existing propane.
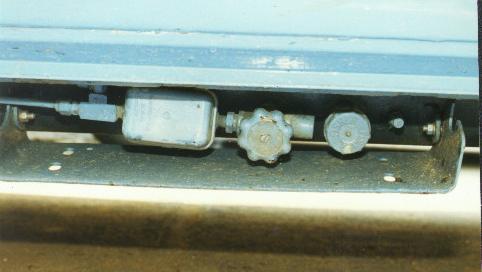
The next step is to remove the rock guard from under the tank. It's attached to the tank with a couple of nuts and bolts. Mine were 13mm. This is not a very challenging step :-)
In the above photo, the tank is shown "before" with the rock guard installed. You can see the nuts and bolts that attach the guard to the tank.
The next step is to disconnect the propane lines, which proved to be an adventure on my tank. The thing to remember is that a lot of gas stuff has left-hand threads, so you actually have to turn it clockwise to loosen it, which is the opposite of how it's usually done. I don't remember if the Westy gas connections are left-hand threads or not, but I think they are. The nuts are a bit big for any regular wrench I had, so I had to use an adjustable. The trick was to undo the nuts on the union without torquing the copper pipes too much. The way I did it was to use two adjustable wrenches, one on the union nut I was undoing and another on the box to the left of the regulator to hold the assembly in place. This worked like a charm.
Once you have the lines disconnected, you can remove the tank. If you look up from under the car, you will see that there are four bolts that hold the tank in place. The best way to do it is to completely remove the two inboard bolts and only loosen the outboard bolts. The mounting holes in the tank are open-ended, so you lower the inboard side and then pull it off the outboard bolts. The tank was not as heavy as I thought it would be.
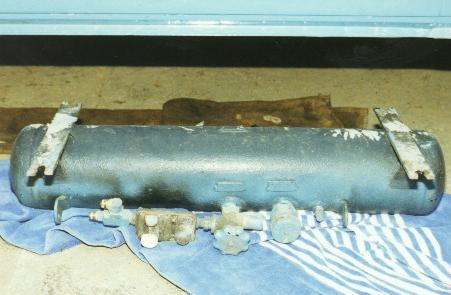
The photo above shows the tank on the ground. You can see that the tank mounts are open-ended. The various things on the tank, from right to left, are: The 80% valve, the fill valve, the on/off valve, the regulator, and the "splitter" which simply puts the propane into two lines, one for the stove and one for the refrigerator.
At this point I took the tank to the RV store and had them put a new valve on. They put the new valve on and put a little propane in it to check for leaks. With the new valve, the tank was ready to re-install.

The photo above shows the new valve installed on the tank. The yellow stuff is teflon tape, used to help seal the threads.
OK, re-installation really is the reverse of removal. The toughest part is holding the tank up against the car while you attempt to thread a couple bolts in with crap falling in your eyes. Once you get the bolts in, you reattach the propane lines (as tight as you can get, I had a small leak until I tightened a little more) and then put the rock guard back on. Now you can go get it filled. The photo below shows the tank reinstalled with the new valve but before installation of the rock guard.
