I didn't delve into the heart of the transmission though I know my 3rd/4th synchro is worn (shifter pops out of third on occasion when I take my foot off the gas), so that's why I call this just a "make over". I'm living with the bad synchro until a transmission rebuild is inevitable (see Postscript). The good news is when that dreaded day comes, all the work I've invested in the nose cone/bell housing I will be able to transfer to another transmission. The rewards for doing a make over and my goals when I set out were: smooth operation of the clutch operating shaft and proper throw out bearing alignment with the pressure plate, elimination of gear oil leaks, and precise gear selection.
For '68-'71 people: before you remove the transmission remember to mark the metal bracket (in a few spots) that bolts to the nose cone where it attaches to the rear motor mount. This will allow for proper alignment of the transmission and make installation simple. '72-up folks might need to do something similar, I'm not familiar with the front transmission mount on the later buses. Also for '68-'71: if you find that the front transmission rubber mount is broken, better start looking for a used one. I could not find a source for these.
Bell housing components: Disassembly of the clutch operating fork shaft components revealed wear on the shaft where it contacted the left bushing and the spacer/washer wore a groove in the shaft. Other wear included both the left and right side bushing, and wear spots on the return spring. I replaced all these components--the only catch was the right side bushing that is pressed into the right side of the bell housing.

It is only accessible from one side (inside the housing) which can make it a challenge to remove, especially if yours is as ornery as mine. It's a split bushing that has square impressions stamped into its surface. The replacement bushing I bought from RMMW is a solid type with a smooth contact surface. I measured a few thousandths of an inch wear using a vernier caliper by comparing the new bushing to the old so I decided to remove the old bushing from the housing. The ID of this bushing is an odd size (14.1 mm) so the obvious solution of threading a bolt in the bushing and pulling it out does not work here. After making some tools that just didn't have the bite to pull that bushing out and after succeeding only in pushing the bushing down further so that it bottomed out in its housing, I called Rick Long of Long Enterprises to find a solution or get a tool for the job. He said he's never had to replace that bushing on a transmission he's rebuilt and didn't have a tool for it. The big local machine shop I brought the bell housing to next didn't want to try to remove it for fear of damaging the housing (!) and the local VW dealer did not have the correct extractor tool (a tool similar to, but a little larger than a starter bushing extractor tool) for the job. But the dealership recommended a local place they bring their tough jobs (like sheared off studs in tricky places and other tedious things that require magic to pull off ;). The place is called Walton Company here in West Hartford, CT (860-523-5231). Frank at Walton had the problem solved in a few minutes. He found a milling tool bit among his tool stash that had just the right size sharp, square end that he hammered snugly into the bushing and quickly twisted it out. That beat my idea of making up a slide hammer-type tool on a lathe with special size threads to grab the bushing.
After all this, I'd say unless your right side cross shaft bushing shows considerable wear, it's probably best not to replace it. The bushing on the left side of the cross shaft (the easy one to replace) takes the brunt of the wear anyway and even a new shaft end when fit in a new right side bushing has some play so replacement is not critical and a few thousandths probably don't matter. And after all the aggravation to remove the old bushing, the replacement (non-split type) did not press in very tightly (it just slipped in) so I ended up knurling the housing and using sleeve retainer to get it to stay put. Unless you're a masochist (like me), I wouldn't risk breaking/damaging the housing to get at that bushing--just clean it and lube it and sleep well. As for the rest of the cross shaft items, the left bushing, rubber sleeves, and return spring install easily. Don't forget to install a new input shaft seal and starter bushing while you have your nose in the bell housing.
In my case, I removed the bell housing so I wouldn't have to lug the whole transmission to Walton to remove that pesky bushing. The bell housing gasket and the nose cone gasket are paper, presumeably treated, gasket material. It appears they were not originally installed with a sealer. I cleaned the oil off the surface of the old bell housing gasket with acetone and then rubbed an extremely thin layer of silicone sealer for reassembly. Bentley recommends use of a fresh gasket (no sealer needed) and I did use one for the nose cone, but decided not to spring for a bell housing gasket. Hopefully no leaks will result from this corner cutting (see Postscript).
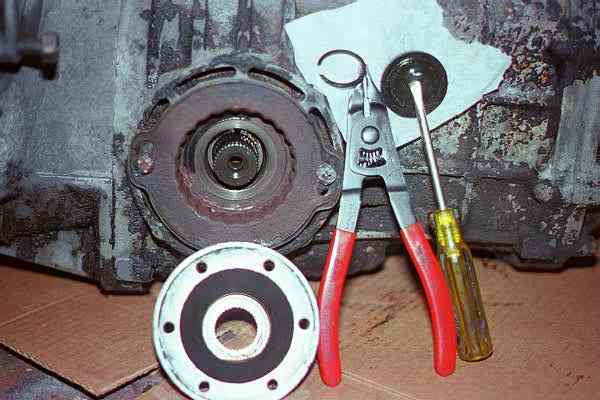
Side gear cover/seals:
First, you'll need to pierce the drive flange grease cap with a screwdriver and pry it out so you can access the cirlip that retains the drive flange.


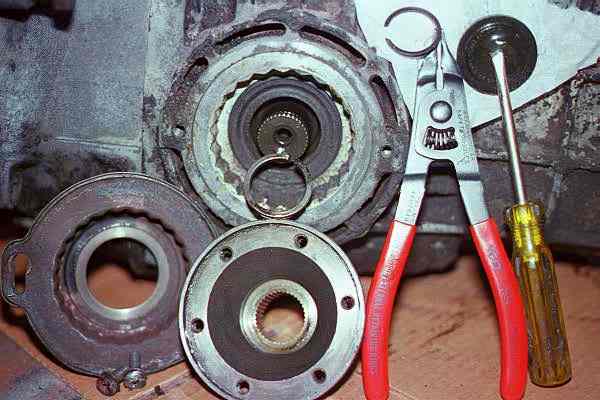
Then, use a pair of cirlip pliers to remove the circlip. Curse as needed.
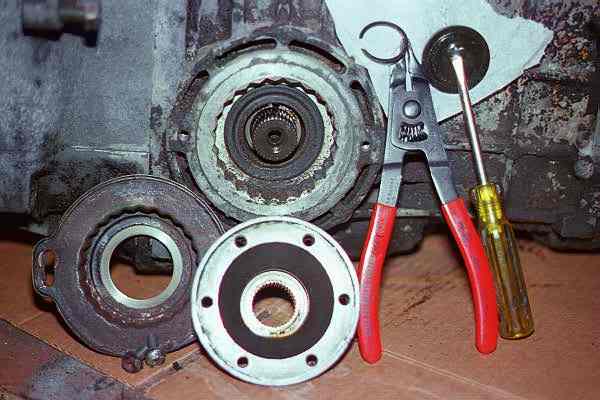
An impact driver ($6 for the cheapo version at my local cheapo tool store) easily removed the phillips head screws that retain the side gear covers. My covers were rusty, so I ended up cleaning and painting these as well.
You'll probably find a flat rubber seal (not pictured) that presses between the face of the oil seal and the side gear cover. Remember to install that on reassembly. Also, you'll discover a spacer ring (with a slit cut down its side) when you remove the drive flange and/or the oil seal. This ring rides on the splined shaft. It has a smooth side and a flat side. Install it so that the flat side faces out, toward the CV/drive flange. It's probably a very good idea to replace the c-clips that retain the drive flange on the drive shaft ends, but I didn't.
Finally, we've reached the drive flange seal, a notorious leaker on old transmissions. The new, German Elring replacement seals look even better than the German originals. The area that contacts the tranmsission housing is thicker than original so you can drive the seal in till it bottoms out (as opposed to the original type which cover only half the depth of the housing--if you get these old style seals you'll have to be careful to only drive them in flush and not go too deep or the seal lip might not make proper contact with the drive flange). A 46mm socket is a perfect diameter tool for driving in the seals. The blue grease caps press in easily with a smaller size socket.
Nose cone: The nose cone is where parts replacement will reap you the most noticeable benefits and perhaps this is all you'll want to do if you just want to spend a little money and get a better shifter feel. The nose cone bushings are easily removed and installed as described in Bentley. The front bushing (FIF) that has a tiny oil seal pressed in its end twists off with a vice-grip and the rear bushing can then be driven out with a drift.
(In the picture below, note the shiny wear areas on the hockey stick. These areas pass through the bushings and are commonly worn due to lack of lubrication. This is because they're working at a high spot on the nose cone that gear oil doesn't adequately reach.)

You'll also discover that the bushings are worn a little thin (especially the rear). The lever/hockey stick was replaced and the inner shift lever oil seal pressed into the end of the bushing. Bentley mentions the bushing might have to be reamed, but this wasn't required in my case. Lubricate the selector lever with gear oil before installation. There's also a plastic ball joint that the small end of the selector lever fits to which wears. All of these contribute to a sloppy shifter feel (in addition to the nylon bushings in the shift linkage). Replacing these yields a decisive shifter feel--now I know what shifting felt like on a new '71 bus :). I'm waiting to hear back from Kyle on the availability of the dust cover/bellows for the inner shift lever (it's the accordion shaped rubber piece that sits over the end of the nose cone) (it's NLA--see Postscript). This is an important piece since it protects debris from reaching and wearing out the inner shift lever seal.
Here's something you'll need to check before finishing the nose cone job: While the nose cone is off it's easy to accidentally depress one of the selectors exposed on the transmission or leave them in an odd position relative to each other if you just happen to be playing with them for the heck of it. If you do this, you might end up discovering after installing the transmission in your bus that the selector hangs up and you can't engage any gear (pulling the transmission, removing the nose cone and repositioning the selectors is the only way to remedy this). To avoid this dilemma, make sure all the selectors are pulled out so that the slots line up, then install the lever that holds the plastic ball joint and the metal rod that loosely holds it in place like a hinge. With the selector lever in the nose cone and just peaking out of the front bushing, slide the small end of the lever into the ball joint and push the nose cone in place. Tighten the cover down and make sure you can push/pull the stub of the selector lever that protrudes from the nose cone--if you can't, one of the selectors is hung up so take the nose cone off and try again until you get it right. The critical thing here is to get the selector slots to line up. You don't want to install the transmission and discover this problem later like someone I know. [innocent whistle]
Shift rods: The final piece of work is the shift linkage/rods. The front rod on the '68-'73 bus has a small nylon bushing pressed into its front end that may require replacement--it is available from most parts suppliers. The rubber boots for the rear shift rod also needed replacing on my bus and while the transmission was out, I pulled the rear shift rod to check the two nylon bushings for wear.

The front bushing was noticeably worn and I installed a new one (it's held in place by two nylon tabs in the bushing that fit into two drilled holes on the rod). I couldn't detect any noticeable wear on the rear bushing but I decided to replace it anyway while I was there. I bought from Just Kampers (UK) what I thought until recently was the correct rear shift rod rear bushing (211 711 185B), that is, until I removed the rear rod and had a look. They instead sent me a rear rod front bushing (211 711 179). But it turned out alright in the end. An alleged 211 711 185B that I only recently located would not stay put on the rod (it was sprung open where it laterally splits and kept slipping out of its retaining hole when pushed in the rear shift rod tube) so I ended up using a 211 711 179 at the front and the rear. The front bushing attaches via two holes in the rod, the rear rod only has one hole to secure the smaller bushing. I probably should've drilled a second hole in the rear of the rod to properly secure the front bushing for use in the rear, but at the time I instead decided to cut off one of the nylon tabs on the bushing. I lubed everything with some semi-synthetic grease. Hopefully I won't ever have to worry about replacing these parts again. There's probably a good reason why VW didn't use the same bushing in the front and rear (too much friction area?), but I tentatively notice no I'll effects with this and the feel of the shifter now is very precise. If you don't want to take the chance, just lube the rod and re-use your old bushing if it looks good (see Postscript, the rearmost bushing is now being reproduced).
In regard to taking up slop in the shifter, I haven't yet mentioned the shift rod coupling set (311 798 211) that RMMW sells for $6.95. This is the coupler/cage that attaches the selector lever to the rear shift rod. Mine were a couple years old but still looked new so I didn't have to replace them--I think the urethane replacement bushings will outlast most of the other parts on the bus. Also unmentioned is the gear shift kit (211 798 121E) which RMMW sells for $18.95 (the stick shift in the cab section). I also replaced these around the same time I did the coupler a couple years ago. When re-attaching the set screws on the shift rods, don't forget to use stainless steel wire to hold them in place.
Listed below are the parts I used on this job, prices and sources. The prices might have changed since I made my purchases, but this should give you an idea of the general cost and the part #s should make it easy to place an order. Special thanks to Kyle Wade of Volks-Motorsports fame for tracking down most of these small, obscure parts for me. He promptly replied to my email, offered a great price, and filled the order accurately. That type of service is invaluable when you're waiting for just the right parts to complete a job. Thanks also to Brian Verbeek who went through the trouble of tracking down some parts and sending them across an ocean, and to Ron at the Bus Depot for providing a critical part, the hockey stick. And thanks to my local VW dealership, Bill Barry VW of West Hartford, CT. Ken Rybzyck, the parts manager, cares about his VW parts customers--even the ones with old buses!
**********************************************************************************************************
                                                                      Price US$
Side gear parts:                                                      (7/22/97) Source


N 090 173 3   Screw w/washer holding side gear oil seal covers (4@1.95) 7.80	VW Dealer
002 301 189C  Side gear oil seal (69-75 bus) (need 2@$5 each)	       10.00	Kyle Wade, Volksmotorsports
002 517 289A  Drive flange grease cap (2@4.50 each))		        9.00	RMMW

Bell housing parts:

113 141 707B  Bushing, clutch operating fork, left 61-75 bus $.95	0.95	RMMW
113 141 711   Bushing, clutch operating fork, right 61-75 bus $1.29	1.29	RMMW
113 141 721   Rubber Sleeve, clutch op. fork, 66-75 bus  $1.45	(2)	2.90	RMMW
113 114 723   Return spring, clutch operating lever			2.50	Kyle Wade, Volksmotorsports
211 721 361D  Clutch cable sleeve (68-79 bus)				6.50	Kyle Wade, Volksmotorsports
002 141 701A  Clutch operating shaft (71-75 bus)		       15.40	Kyle Wade, Volksmotorsports
113 301 155   Starter motor shaft bushing (67-79 bus)			1.25	Kyle Wade, Volksmotorsports
002 301 131A  Bell housing gasket (68-75 bus)
(091 301 131  Bell housing gasket 76-79 bus)

**note: not included in this list are thet two circlips that hold the clutch operating fork shaft in
place--it's probably wise to also replace the old clips with new ones.

Nose cone parts:

001 301 227C   Seal Inner Shift lever					5.10	Kyle Wade, Volksmotorsports
001 301 207    Bushing Rear Gearshift housing (68-75 bus)		2.65	Kyle Wade, Volksmotorsports
001 301 209    Bushing Front Gearshift housing (68-75 bus)		3.55	Kyle Wade, Volksmotorsports
004 301 241A   Ball joint, inner shift lever				2.50	Kyle Wade, Volksmotorsports
113 311 113A   Input shaft seal						3.50	Kyle Wade, Volksmotorsports
091 311 541    Inner selector lever (aka hockey stick) (68-79 bus)     33.00	Ron Salmon, Bus Depot
211 301 289A   Dust cover inner shift lever (68-75 bus)			No Longer Available (see Postscript below)
002 301 215    Gasket, gearshift housing (68-mid73 bus)			1.60	Kyle Wade, Volksmotorsports
(002 301 215A  Gasket, gearshift housing mid73-79 bus)

Shift linkage parts:

211 711 179  Rear shift rod front guide nylon bushing/sleeve   			Just Kampers
211 711 185B Rear shift rod rear guide nylon bushing/sleeve   			Jim Thompson, OldVolksHome
211 711 183B Rear shift rod boots (need 2)
211 711 197  Front shift rod nylon bushing/sleeve 66-73 bus		2.39    RMMW
**********************************************************************************************************
Postscript: 20k mile Update
October 9, 1998
It's been over a year and 20,000 miles since I installed the transmission. The transmission's
exterior is still bone dry (no leaks). The flat black rustoleum paint is flaking off, which
I attribute to the lack of prep work before painting. The engine case that I painted at about
the same time was cleaned twice (before and after machine work) and the flat black paint has held up
much better than the coating on the transmission. Oxidation of the magnesium had apparently been
neutralized on the engine case (which was hot cleaned at a machine shop) but not for the
transmission (which I degreased and wire brushed only before painting).
Since my article appeared on the type2 list, Jim Thompson (Oldvolkshome) has reproduced the previously obsolete rear shift rod rear bushing and sells this in a kit with the other bushings needed to renew the shift rods.

The rear rod front bushing that I bought from Just Kampers is now readily available in the States though Jim remains the only source I'm aware of for the rear bushing.

The rubber shift boots (211 711 183B) which I was fortunate to get through a friend in the Netherlands, Brian Verbeek, are no longer available in the US, but I notice Just Kampers in the UK lists them as part # 211 711 167A in their 1998 catalog for approx. $7.50 each. The same catalog lists the 211 599 201A '68-'71 transmission rubber mount, but availability seems sketchy since you must call for a price. This part is also no longer available in the US and is not yet reproduced in the aftermarket.
(Note: As of July '99 it's rumored that Wolfsburg West will be reproducing these shift rod boots. Contact them for details.)
Another elusive part is the rubber dust cover for the inner shift lever (68-75 bus 211 301 289A). If your transmission has not been rebuilt, you'll likely have the remnants of this piece still attached to the nose cone. It was long ago discontinued by VW. Interestingly, the 1979 US fiche for '68-'79 buses lists part # 211 711 115A as a suitable replacement--this part # is also the boot at the base of the shift lever in the cab (in some catalogs it might also be referred to as 111 711 115A because it was interchangeable with boots on other VW models).

After my transmission make over, I obtained a NOS 211 301 289A dust cover and leared from Brian Verbeek that there were two incarnations of the 289A. Though functionally the same, one type (presumeably earlier) is pleated and a later verson is smooth, without pleats. Since they're no longer available or listed in catalogs most people appear content to leave this part off without attempting to fabricate a home brew equivalent. Perhaps they use the shift lever boot as the fiche recommends, though I haven't attempted to fit one. The nose cone bushing will get contaminated easier without a dust cover and it is therefore worth the effort to install something functionally equivalent to the original.
Michael Donnellan brought to my attention that Transform (a transmission rebuild/parts shop in the US) offers rebuilt nose cones that allow the '68-'75 002 transmission owners to use the '76-'79 091 transmission nose cone that is presumeably smoother shifting (spring loaded selector lever) and has less wear probability. They also offer a machined steel replacement for the plastic ball joint (004 301 241A). Michael and others have highly recommended the nose cone upgrade, so you might consider this option vs. replacing the individual, original components on your 002. Weddle Engineering, another US VW transaxle rebuilder, also offers this upgrade kit. Prices are about $45 for the 091 nose cone kit, $6 for the steel ball joint.
The problem I reported of the shifter popping out of 3rd gear when the transmission was loaded by removing my foot from the accelerator has occured only 3-4 times over the past 20k miles/1 year. It occured as many times the year before with approximately the same miles traveled. So for now, the 3rd/4th synchro appears not to be deteriorating further, though I am ever alert for a change in its status.
Happy shifting!
Vendors:
LONG ENTERPRISES
Rick Long
VW Transaxle Parts Specialists
Rick Long
Bill Barry Volkswagen
Ken Rybczik (Parts Manager)
New Park Ave.
West Hartford, CT 06119
Bus Depot
Ron Salmon
4801 Gravel Pike
Perkiomenville, Pa. 18074
(215) 234-VWVW
The Old Volks Home
Sherwood Automotive
Jim Thompson
(530) 221-5342
Rocky Mountain Motorworks
1003 Tamarac Parkway
Woodland Park, Colorado 80863-7716
1-800-258-1996
Volks-motorsports
Kyle Wade (& Gina)
1823 Soquel Ave
Santa Cruz, Ca 95062
Back to Main
